~ H A P P E N I N G S A R O U N D
T H E H O M E S T E A D ~
Hi everyone, HAPPY AUTUMN to any Kiwi readers that stop by here and Happy Spring to everyone else. I've read so many blogs and posts lately where people are super excited that it's Spring :) while here on this side of the world its early Autumn and we're already thinking about and planning for Winter. We just had the first big load of firewood delivered, so it gets me thinking about chimneys needing to be cleaned and everything related to heating.
We were considering purchasing a new fire this year to heat our home, but after getting a professional in to take a look at ours, we soon realised the repairs wouldn't cost too much and the fire was worth keeping. It's still a good sturdy fire (a YUNCA) and with the repairs to the damper, new ceramic bricks etc, it will be good as new and keep us cozy again all Winter long. Plus we're installing a heat pump/air conditioning unit so on days we're out and about or at work, we'll just use the heat pump. Firewood is around $300 a cord in our area, and we generally would get through 4 cords in the cold months, so it works out more economical for us to utilise both heat sources rather than just using the fireplace all day every day. Update: It's been repaired now. Cost: $750. If we had replaced it, with the installation costs, we would have been looking at paying about $7,500 - $8,000 !!!. This should be good now for another 8 - 10 years.
I N T H E G A R D E N:
The garden is starting to get that shabby look it always gets this time of the year. I find I just need to keep chipping away and pruning/cutting back and weeding something at least every week to try and keep on top of it. Before long the days will be dreary, foggy and dark and too cold to even venture out, so I need to enjoy the warm days we still have and do as much as I can.
This past weekend I've been picking and gathering in the last of the summer harvest and bottled a dozen jars of Salsa.
We use the Salsa in Chicken or Beef Chilli, which we eat a lot of. I like to serve Coleslaw on the side. Generally I cook 6 nights out of 7 during the week and all meals are made from scratch. It's what we enjoy.
Many if not all our meals will have some vegetables that we have grown ourselves. Even now there are still quite a few vegetables in the garden: beans, Kale (Cavolo Nero), tomatoes, carrots, beetroot, potatoes, lettuces and of course herbs. We also have a few yellow plums, plenty of apples, some pears, & a few raspberries still growing too.
I try to make simple inexpensive meals and tend to avoid food fads. We buy free-range eggs from our granddaughter, as they have quite a few chickens and our son in law John supplies us with plenty of meat.
Here are a couple of recipes I wanted to share. They are all simple and don't require expensive ingredients.
Pumpkin/Apple Spice Muffins
I made these very delicious moist muffins last week since we have so many apples on our trees. I also had cooked/mashed pumpkin frozen in 1 cup bags still in the freezer since last summer, so I thought it was about time I used it up. I hate to waste anything. :/ The nutmeg adds a lovely deapth of flavor to them.
This recipe would be considered a THM - E (Trim Healthy Mama Energising meal)
~ I find the secret to these muffins having a good texture, since their is no egg yolk and no gluten, it's necessary to stir the mixture well. Generally a muffin mixture should be folded gently, but not with these ones. ~
~ I love this Almond Butter !!!! Even though it's $10.00 a jar. I love to cut the muffin in half, spread a wee swipe of almond butter on it, and then a few slices of banana..and oh my..what a treat. My husband loves these muffins too ~
~ Pumpkin/Apple Spice Muffins ~
Dry Ingredients
2 & 1/4 cups of whole oats ground into flour
1/2 teaspoon sea salt
1/2 - 3/4 cup of alternative sweetener (eg. erythritol and stevia blend)
or 1/2 cup sugar if you use sugar
1 t baking soda
1.5 teaspoons baking powder
1/4 teaspoon Nutmeg
1- 1.5 teaspoons cinnamon
Wet ingredients:
1 t vanilla
2 small level teaspoons molasses
1 cup plain unsweetened yoghurt
1 teaspoon vanilla
1/4 cup water
1/2 cup egg whites
(or 2 whole eggs if you are not concerned about fat)
-
1 apple - peeled and diced small
1 cup cooked mashed orange flesh pumpkin
(yes that's correct there is no added fat)
Method:
1. Preheat the oven to 180 C/350 F
2. Line a x 12 muffin tray with paper cups. I spray mine with cooking spray.
3. Measure all the dry ingredients into a bowl. Use a whisk to mix.
4. Make a well in the centre of the dry ingredients and gently pour in the wet ingredients. Add the pumpkin and apple. Mix very well.
5. Spoon evenly into 12 muffin cups and bake in the oven about 22 minutes. Remove from the oven and gently lift the paper case muffin onto a wire cooling rack.
6. Once they are cool I normally freeze them, and will defrost them as we need them for lunches.
P.S: Let me know if you try this recipe :)
Simple Beef Casserole
1 kilo (2 pounds) meat cubed
2 onions - slice into rings and brown in some oil
2 - 3 carrots - sliced
1/4 - 1/2 cup peas
2 x Beef oxo (bouillon) cubes
1 T BBQ sauce
2 T Worcestershire sauce
1 D soy sauce
1 t mixed herbs
1 t ground pepper
1 teaspoon sea salt
Fresh ground black Pepper
2 cups of hot water
Note:. This can be cooked in a slow cooker. Just put it on early in the morning (8 - 9 am.) Let it cook on low all day until the meat is tender. Thicken when cooked with a packet of brown gravy mix or some cornflour)
1. If cooking in the oven, preheat the oven to 160 C.
2. Place all ingredients in a casserole dish and cover with a tight fitting lid. If the lid doesn't fit well I cover the dish with foil and then put the lid on.
3. Cook for about 4 hours. Thicken with a packet of gravy powder or cornflour. Adjust the seasonings if required.
4. I like to serve this with either steamed potatoes and green beans or cooked mashed cauliflower (a low carb meal) and green beans.
Enjoy.
Red's Breakfast Sausage Patties
I make these about every 6 weeks. I buy fresh meat and freeze
the little patties between layers of parchment paper. We enjoy them with
eggs for a cooked breakfast.
Recipe
1 kilo - beef mince
500g Pork mince
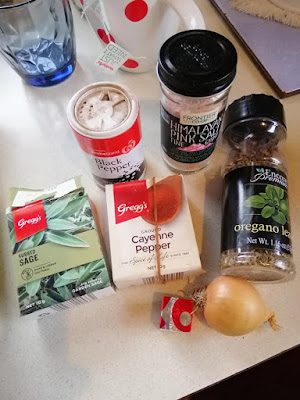
1 t oregano
1 Tablespoon brown sugar
1.5 t salt
2 - 3 teaspoons dried sage
1 egg
1 small onion - diced fine
1/2 teaspoon crushed red pepper flakes
2 teaspoons ground black pepper
Method:
1. Mix all together well and form into small patties.
2. Keep a few in the fridge for dinner :) or freeze them in a container between layers of
parchment paper.
3. These can also be thawed, crumbled up and cooked to use on a pizza. Yum.
. . . . ~ ~ ~ ~ ~ ~ ~ . . .
When I'm not busy cooking food to eat, pottering in the garden, preserving food, cleaning the house, or helping my daughter with the children, I will probably be busy making soap..oh joy..life is abundant, busy and very good :) ...however I am also mindful of others going through very difficult times right now, such as Gina and Ed over at the blog 'Home Joys'. Ed has brain cancer and his latest diagnosis wasn't good. We've been praying for this family ever since the first diagnosis 2 years ago. If you stop by here and are a prayer warrior like me, please lift up this sweet christian family. They will appreciate it as will I.
~ Blessings to anyone who stops by ~
& please leave a comment. Let me know what your doing too,
whatever season your in.
xo


