Two wings lift a person up from earthy concerns: simplicity and purity. Simplicity should be in intention, purity in feelings. Simplicity reaches out after God, purity catches hold and tastes. ~ Thomas A’Kempis

Wednesday 8 December 2010

Tan Fingers Slice & Amish Cookies


Tan Finger Slice


This slice is quick and inexspensive to make. Its a longtime favourite of mine and has a a lovely buttery, almost shortbread texture on the base. The filling is like caramel..mmmm, need I say more :0)
Base:
175 grams butter (softened)
2 1/4 Cups plain flour
1 teaspoon vanilla essence
1/2 Cup sugar

Cream butter, sugar and vailla until light and fluffy. Add flour and mix well, until all is crumbly.

Filling:
1/2 Can of condensed milk
1 1.2 Tablespoons of golden syrup
50 grams butter

In a saucepan over a low heat melt the filling ingredients and stir until combines. Set aside.

Line a square pan with baking paper. Press 3/4 of the base into the pan. Pour over the filling and spread out evenly. Crumble the remaining base mixture evenly over the top.
Bake at 170 Celcius for 20 minutes in the middle of the oven. Cool and slice when cold.


Sunday 28 November 2010

Gemma's sticky Gingerbread


One night just before falling asleep, I had such a strong desire for gingerbreand !!!to the point that I had to get out of bed and hunt out an old recipe. I havn't made this for years...but remembered it was lovely and light, moist and a little sticky. The day before I baked it, I had spent an afternoon visiting some friends, and my young friend 'Gemma' (5yrs) was busying herself in her sandpit, making me all sorts of creations..such as chicken, banana and chocloate cupcakes lol..her desciption (really sand of course with a flower on top). I dutifully pretended to eat them all..but the joy she had in her creations and mixing sand and water made me smile and reminded me of my own fun making mud pies as a child..(the beginnings of my foodyism I think). When I was mixing this large bowl of gingerbread batter..in all its gloopiness, I decided to rename it Gemmas gingerbread.. : 0)
I like to serve it buttered. It could have a simple glace icing I suppose, but simple and rustic suits me.
* ENJOY *

(Makes 2 cakes 250g butter - melted
1 Cup golden syrup (or 1/2 treacle/1/2 golden surup) - darker cake

1/2 Cup brown sugar
1 rounded Tablespoon ground ginger
2 teaspoons mixed spice
2 teaspoons baking soda
2 teaspoons baking powder
1/2 Cup rolled oats
4 Cups flour ( I used 2 Cups wholemeal/2 plain)
4 eggs - large
2 Cups of warm milk


Method

1. Line 2 pans with baking paper.

2. In a large bowl sift all the dry ingredients together. Add the oats and mix through.

3. Warm the syrup. Pour milk,syrup, butter and eggs into the dry ingredients.
4. Mix all with a strong whisk, until well combined.

5. The consistency should be like pancake batter. Pour into the prepared pans.
6. Bake at 170 Celcius for 25 minutes (in middle shelf), or until a skewer inserted comes out clean.
7. Cool on racks. I think this gingerbread is better the next day. I wrap it in cling film, keep the baking paper on it and stor in an airtight container.


Friday 26 November 2010

My Easy & Light Sushi


Makes 3 long rolls of sushi (about 16 slices all up)
I like to keep sushi making simple, but there are many fillings which can be used, such as omeltte egg roll, salmon, avocao, toasted sesame seeds etc..

Ingredients:

1/2 Cup short grain white rice
1 Cup water
1/2 teaspoon of salt

Bring the water to the boil, add salt and rice and reduce to a simmer for 15 minutes.
Meanwhile..

Microwave 2 T white vinegar and 1 dessertspoon of sugar until dissolved.

Filling:
1 can of tuna in oil
Cucumber and radish - sliced into strips

Mehtod:
When the rice is cooked, add the vinegar mixture and stir through until its all absorbed.
Cool the rice mixture.
Place a nori sheet shiny-side-down on your rolling mat.  Cover with rice from side to side, but leave a 1-inch spacer on the top and bottom


Place your “fillers” (tuna, cucumber & radish) on the edge of the nori sheet closest to you. Make sure the fillers are in front of the rice.


Using you rolling mat, nudge the roll forward. Squeeze the roll tight to ensure the edge is sealed.


Remove your roll to a cutting board, and cut into 6-8 pieces.
Enjoy by dipping into soy sauce . I put a little wasabi (pea size) in the base of the dipping bowl and add the soy on top, mix with a spoon. I also serve some pickled ginger on the side. Enjoy


Hokey Pokey Biscuits


These biscuits were a childhood favoutite of mine. Nearly every weekend we would go to visit my nana and she baked all week to prepare for the onslaught of grandchildren. The table was always groaning under the weight of pikelets with jam and cream, a white & chocolate cream filled sponge, scones...biscuits and on and on. After everyone ate their fill, us children would go crazy and run all round the neighbourhood, coming back and hour or so later to refuel. In Nan's old pantry she had all thses biscuit tins stacked up (about 7) and she would say 'you can have one of each) !!! lol..we all would beam huge smiles and pile the biscuits up in our hands. These hokey pokey biscuits, well my nana's ones were huge, lovely and chewy. Whenever I bake them, a wave of nostalgia fills my mind and heart 'the sweet memory of my lovely Nana)..She was a true homemaker :0)
Ingredients


125g butter, softened
1/2 cup caster sugar
1 tablespoon golden syrup (May be sold in the speciality foods section in USA supermarkets. Its not the same as corn or maple syrup - has quite a unique (golden) flaour)
1 tablespoon milk
1 teaspoon bicarbonate of soda
1 1/2 cups plain flour

Method


Preheat oven to 180°C. Line 2 large baking trays with baking paper.

Using an electric mixer, beat butter and sugar until light and creamy. Place golden syrup and milk into a heatproof microwave-safe jug. Microwave for 20 to 30 seconds on HIGH (100%) power or until hot. Stir in bicarbonate of soda (mixture will bubble up). Add warm milk mixture to butter mixture. Stir until well combined. Sift flour over batter. Mix well.

Roll 2 teaspoonfuls of mixture at a time into balls. Place onto prepared baking trays, allowing a little room for spreading. Gently press biscuits down with a floured fork.

Bake for 12 to 15 minutes or until golden and firm to the touch. Stand on trays for 3 minutes. Transfer to a wire rack to cool completely. Store in an airtight container at room temperature.

Friday 12 November 2010

..... ~ NOVEMBER ~ ....


Hello.... I didn't think I was going to ever get this blog written because I've been so busy in the garden - tackling some major projects. and before I forget, I wanted to add this link to a wondeful New Zealand cooking show. Its set in the South Island of New Zealand (Central Otago), the area I grew up in and would spend holidays etc.   http://tvnz.co.nz/free-range-cook/recipes-group-3691722 Annabel is fabulous, a woman after my own heart and totally connected to the earth and her garden ..:0)


http://tvnz.co.nz/free-range-cook/s1-e11-video-3890127 a video of last nights show at the AMP show :0)
Check it out, you'll love it !
Here;s a cool NZ cookbook review site and talks about Annabels latest cookbooks. http://beattiesbookblog.blogspot.com/2010/09/free-range-cook-companion-cookbook-to.html
Other stuff: Already people are talking about Christmas, and on at least 2 seperate occasions people have asked me if my Christmas shopping is all done !!!!. I don't really start getting into preparations till at least December. There's not so much need now that the children have all grown. I'm looking forward to going to my daughter Katies for Christmas day. It'll be fun to plan and cook with her and get to see my little grandaughter Lily too.

Little Lily on the dairy farm, in the cow shed (4 1/2 months old). Isn't she the cutest :0) She certainly won't be hard to shop for !!!

Now as for the garden, I have quite a few invasive plants that if I don't keep on top of, could literally take over and spread throughout the whole property. I'm talking about Ivy, Blackberry, Convovulus..and another creeper kind of thing, which I suspect is Old Mans Beard. It winds itself around trees and attaches itself with what looks like hariry tentacles. They seem to be glued on like cement !!! :0(. Over time, it takes over the host tree, suffocating it, & is impossible to remove....and eventually the tree needs to be removed. We don't get snow here in Central Hawkes Bay, so these creepers have opportunity to flourish all year round. Hence I've been gradually (over 3 years) hacking, weeding and pruning my way around the property and now a once dark, over grown garden, is finally starting to see the light. Hallelujah !

The Making of Raised Beds:

Where it all began in the vegetable garden. Each of the treated timber boxes are 1.5 metre square. Weed matting was laid at the base of each box and around the sides. 

Black polythene plastic was stapled gunned inside to prevent any chemicals from the treated timber leaching into the organic compost, and also to preserve the wood longer. 


The raised bed vegetable garden and my amazing 3 wheeler wheelbarrow over yonder ..makes moving plants and weeds around a whole lot easier. I've planted beans, carrots, silverbeet (chard), various lettuces, some baby leeks, spring onions, celery and radishes. Over by the shed are some tomato plants (heirloom seed varieties and a black cherry tomato plant and some zucchini seeds have just sprouted in my propogator. At the garden centre, zucchini plants were $5.00 per plant, & their was no way I was paying that, when a whole pkt of seeds only cost $3.50, so much more economical. So far 3 plants are underway !!! already (after only 10 days).


Little orange tree now..


Strawberry plants beginning to ripen. I covered them over with netting, because the birds already were enjoying them before I could pick one !!


Pretty Alstrameria flowering out in the front garden.


tall long stemmed red roses..just peek above my living room window :0)

 I've included a couple of recipes from some baking I've been doing latley...enjoy :0)


* MARSHMALLOW TREATS *


Ingredients

Pink & White marshmallows
1/2 Can Condensed milk
2 Cups biscuit crumbs
1 dessetspoon cocoa
1 teaspoon vailla essence
100 grams melted butter
dessicated coconut


1. Mix the melted butter, condensed milk and vanilla together with a wire whick, until all combined.

2. Add cocoa to crumbs and mix through, Pour buttery mixture in and mix well until it forms a dough

3. Take a large teaspoon of thie mixture and shape it round a marshmallow.
 Roll into a ball shape and then into the coocnut, until coated.
4. Chill the marshmallow treats in the refrigerator in a covered container..enjoy :0)
 .

* ~ 'SPRING'S LEMON BUTTER CAKE' ~ *

 A new summer dress and bottle of perfume, got  me in the summery mood....and lemon for some reason seems like a summer flavour. Maybe because of hmemade lemonade?.  Ayway the other day I had such a craving for this cake, that I went in search of the recipe. I used to make it  a long time ago when my children were small and as it makes a large cake,  I decided to halve itand it turned out great.  I hope someone will try it & let me know how it turns out.

Ingredients

100g butter - softened
2eggs
1 Lemon - freshly picked - or an organic unsprayed, unwaxed Lemon
1/2 Cup full cream milk
1 1/2 Cups Self Raising Flour
3/4 Cups White Sugar

Method

1. Wash the lemon and thinly peel the rind. Cut the rind into thin strips, remove the white pith from the lemon
    and discard. Segment the lemon and set aside.
2. Using a food processor (I use a small one, it works best with this quantity), place the sugar, and lemon
    rind in and pulse until finely chopped. Add the softened butter and and blend until the mixture is creamed.


3. Add the eggs one at a time, pulsing well, then add the lemon segments. Pulse untill chopped fine.  Add the
    milk, blend gently and then pour the mixture into a bowl. Gently fold in the flour - half a cup at a time.


7. Spoon the ,mixture into a smallish round cake tin. I line mine with aluminum foil and then spray with
    cooking spray...or use a non stick pan.
8. Bake at 170 C for about 40 minutes.
9. Cool on a rack and ice with desired icing. I used Betty Crockers Vanilla icing (because I love it), but a
   cream cheese lemon or vanilla icing would also be lovely.


Wednesday 13 October 2010

~ * Home Made Bread * ~


Its a cold wet day here at the little homestead, and I decided to fill the house with the smell of baking bread..mmm. I found one of my first hand written cookbooks and my tried and true recipe for bread. I got this recipe from a bread making workshop I attended many moons ago, when I was a young wife. The workshop was led by an old dutch woman, and she made beautifull bread, using a 'sponge batter method '. It's got to be one of the easiest recipes I've ever used, and when my children were younger, I used to bake this bread twice a week, (3 loaves each time...phew :0)..glad I don't have to churn that much out anymore. I also went through a phase of grinding my own wheat by hand !!!!! crazy ? (yes). My impatience got the better of me, and instead of waiting and saving for the electric model, I got half way with the saving, and bought a hand cranked one. Note to self: patience pays of, impatience never does !! So now the hand grinder is yet another thing in the 'shed', in its box, sigh....So anyway thats a little story about my bread making history..I hope you'll try this recipe :0)

'Wholemeal Bread'

500g white flour
1 egg
1 Tablespoon of sugar
1 1/2 pints warm water (900ml)
3 teaspoons dry yeast
1. Mix all with a whisk in a large crockery bowl. Cover with cling film, and wrap in a warm towel. Leave in a warm place for 30 minutes. The batter should have small bubbles on top. Now add:

2lb (1kg) stoneground wholemeal flour (I use organic)
1 T sesame seeds, 1 T linseeds, 2 T sunflowers seeds
1 Tablespoon sea salt
3 Tablespoons Olive oil or rice bran oil

2. I add the flour in batches, stirring vigurously with a wooden spoon, add all other ingredients (first). Turn out onto a floured bench and knead for about 5 minutes. When the flour is all incorportaed and the dough smooth and elasticy, put it in a large bowl, which has been wiped around inside with some olive oil, just to help it not stick as it rises.

3. Cover with cling film, and wrap with the towel again. Place in a  warm place for an hour.
4. Punch the risen dough down in the bowl.

Turn it out, divide into loaves. I cut it in 3, 2 larger loaves and 1 smaller. Grease the tins well and sprinkle seeds inside for a crunch crust. Place dough in tins. Brush loaves gently with some milk, and sprinkle with more sesame seeds.


 Leave covered lightly with a damp tea towel for about 20 minutes, or until risen to the top of the tins.
5. Bake in the centre of a hot oven, about 200 C for 40 minutes. The loaves are cooked, when they sound hollow when tapped on the bottom.


Once cooked, I place the loaves on a cooling rack and cover with a clean tea towel. This helps the crust to soften a little.
Tip: Cool loaves, slice to desired thickness, then freeze.


Saturday 18 September 2010

'Fabulous & Easy Naan Bread'

A few weeks back I was making a beef curry and decided to google a recipe for Naan bread. I found this one, and its amazing. Lovely, soft and chewy..perfect for soaking up juices from curries..I hope you'll try it.
You'll need:
2 t dried yeast
2 t sugar
1 cup warm water

-
1egg
3 T warm milk
1/4 cup white sugar
2 lge cloves garlic crushed
4 1/2 C bread flour
2 t sea salt
1/4 C melted butter

METHOD

1. Dissolve the 1st measure of sugar in the warm water. Sprinkle the yeast over. Cover with cling film,wrap in a small towel and set aside in a warm place for 15 minutes - to froth.

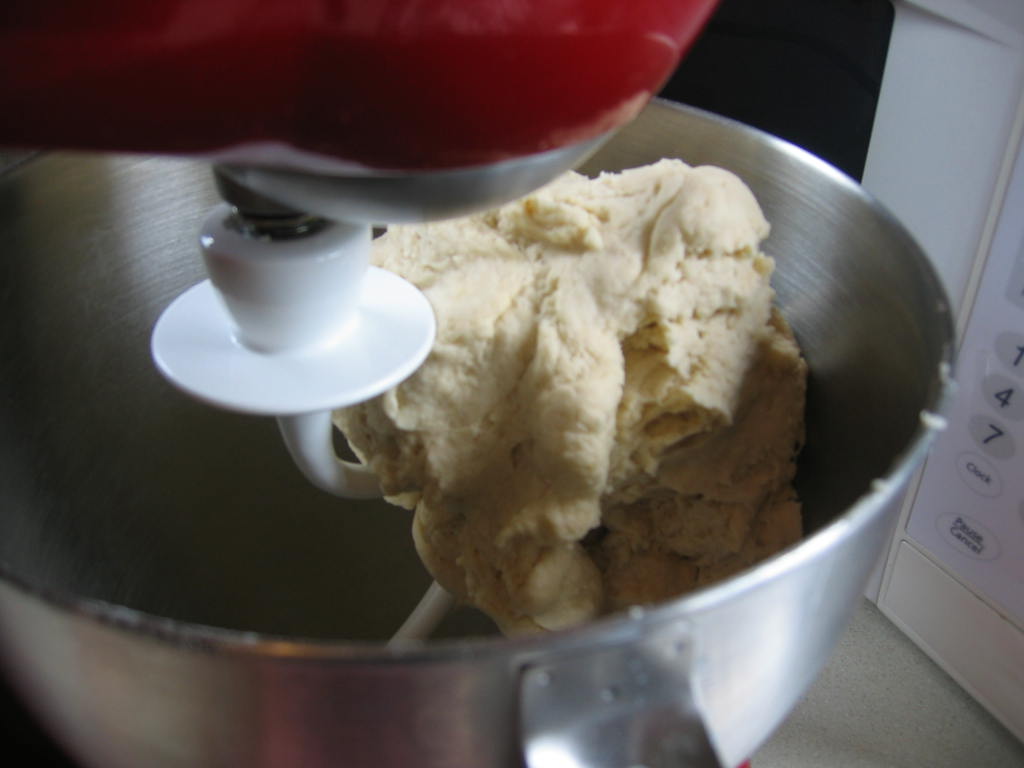
2. Put the dough hook on your mixer. Into the mixing bowl add all the remaining ingredients, egg, milk, flour etc


 Pour over the frothed yeast mixture. Turn the machine on to medium to allow the mix to combine. Once its combned, crank it up higher to knead the dough, let it knead for a few minutes.

 Turn the dough out, It shouldn't be sticky or dry, but all well combined.

3. Oil a medium size crockery bowl and place the dough in.Turn it over, so the topside is oily. Cover with cling film and a tea towel. leave in a warm place to rise for 1 - 1- 1/2 hrs.


4. Punch dough down. Divide into about 8 pieces. Roll each piece out on a board, till slightly larger than your hand. I don't add any extra flour.

5. Heat the grill pan, AND TURN THE OVEN ONTO 180 c. When the grill pan is heated to medium - drizzle some olive oil over. Brush one side of the rolled out Naan dough with melted butter and place this side down in the grill pan. Leave for a minute , press down with a spatula. Brush the other side with butter. Flip it over, and press down. leave for a minute until it rises some.

 Then remove to the oven, and leave in for about 5 minutes.


Should rise a bit more and be cooked through. Place onto a paper towel lined plate, and cover with a t-towel.

6. Continue to cook all the renaining Naan's in the same way.

7.  I used a couple of Naan's to make Pizza's..

~ Naan Pizza's ~


You'll need:
Tomato paste
oregano
sugar/ salt/ black pepper
toppings: salami, cheese - mozzarella/parmesan
mushrooms, peppers, olives, tomato & onion

1.Preheat oven to 180 C.
2. Spread some tomato paste on the Naan bases (about 2 T ) on each. Sprinkle oregano, some sugar and parmesan over each.
Place whatever toppings on that you want.

3. Bake for 10 minutes at 180 C, then turn the grill on, to brown the tops a little...
4. Enjoy :0)

Strangers and Pilgrims

  Hello dear friends and quiet followers, I hope your week is going well? It's Winter here in my corner of the world, so I am tucked up ...