Hi everyone :)
About a month or so ago, I decided to try my hand at learning to make 'Sourdough Bread'. I love making bread and it's something I've missed terribly since starting Trim healthy Mama. I knew Rye sourdough was on plan and had been ordering it online, but it was costly and being the frugal gal that I am I really like to try and make things from scratch (if I can). BUT I still didn't think I would have the time to try to learn how to make it myself and thought the process might be too time consuming. I've been making regular yeast breads & bread maker sort of bread on and off for more than 20 years, so I'm very familiar with all things 'bready', but just never sourdough. However because I like a challenge and enjoy learning new things, especially anything to do with healthy eating and living a self sufficient lifestyle, I continued on with my research & watched a ton of sourdough bread making videos on Youtube. One video in particular was very detailed and easy to follow (Elle's method). She made me feel like 'I think I can do this'. So I decided I may as well just try it and if it failed, well at least I gave it my best shot. Now, I am so glad I persevered !! :0)
So what is Sourdough Bread?
Wikipedia: Sourdough is made by the fermentation of dough using naturally occurring lactobacilli and yeast in the starter. It has a mildly sour taste not present in breads made with bakers yeast and better keeping qualities due to the lactic acid produced by the lactobacilli.
Sour-dough bread reduces the effects of Phytic Acid, which causes wheat intolerance in some people. Sourdough may also help heal the gut for people newly diagnosed with Celiac disease. The starches are reduced during the fermenting process, which is great for people watching their weight or just wanting a healthier diet.
Note: I've noticed I don't get a bloated tummy when I eat it, which is wonderful.
~ 1st step - the Starter ~
*This is my lovely 'Starter' (pictured above). ~ frothy and bubbly ~
A starter is basically flour and water, covered with a cloth and left in a warmish spot for about 3 - 4 days. It will harness the natural yeasts from your own home environment (this will be more effective if your home is not cleaned with harsh chemicals) and will eventually start to ferment and bubble. Sounds easy? Well one would think so, but given that it's now Winter here in New Zealand, my kitchen just seemed to not be warm enough to get it activated. I threw away my first attempt, and the second..sigh. By now I was starting to get thoroughly discouraged...and then..ta da !! I found a video on You Tube which made a starter using water and pineapple juice with flour. I watched it through a couple of times and thought what have I got to lose, so I tried it and it worked. I sat the starter, wrapped in a hand towel and covered with muslin, on the sunny window sill during the warmest part of the day and just on my kitchen bench the rest of the time.
The Basics: You need to use pure water for your starter, not tap water as it may contain chlorine etc. I used bottled water and unsweetened pineapple juice, for the method I followed.
I include a hand written recipe at the bottom of this blog which I typed up from the video I watched. I initially inserted the video inot this post, but a whole bunch of additional script came with it, so I deleted it. If you type 'Elly's Everyday Sourdough', you'll find her channel :)
The recipe for the starter and how to make the bread is all at the bottom of this post.
~ Muslin covers I made to cover the starter (also I place a paper towel
underneath the muslin cover, just in case it rises too much, like it did today !!) ~
~ My Kombucha got a new little muslin cover too ~
I made about 5 of them.
I also watched Elle's video for making the sourdough bread, which is easy to follow. My bread turned out beautiful. Since then I've made another four batches, and I double the recipe each time to yield 2 loaves of bread. I gave some of the starter to my daughter and we made sourdough bread at her house.
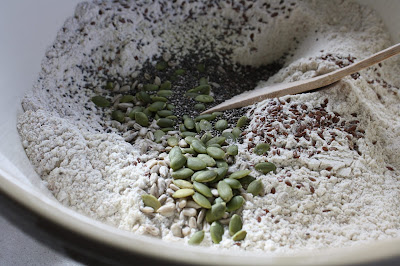
I chose to use Organic flours to make the starter and for my bread, but the bread itself works equally well with regular flour from the supermarket, as thats what my daughter used. I used Unbleached white flour and stone ground Wholemeal flour, with a little organic Rye flour too. I add a 'seedy mixture' Linseed, Pumpkin, Sunflower, Sesame & Chia.
I pretty much followed the video to the letter, as I wanted to achieve a good result. She does mention that the more mature the starter is the better it will perform. I've noticed this is true as mine is a lot more bubbly and yeasty smelling now. Now I just store the starter in the fridge and feed it once a week, following her instructions. I've also used the starter to make Trim Healthy Mama Sourdough Pancakes, which also turned out great.
Sourdough bread keeps longer than regular bread too, with a lovely springy, moist, slightly chewy texture that I just love. It slices well without any crumbling because of the high hydration (water content. There is no added sugar or oil and no additional gluten flour is needed.
~ ~ ~ ~ ~
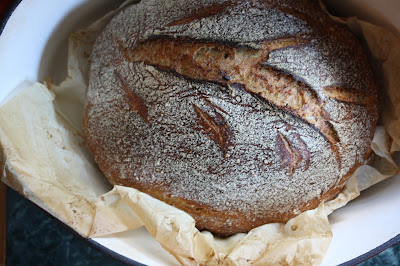
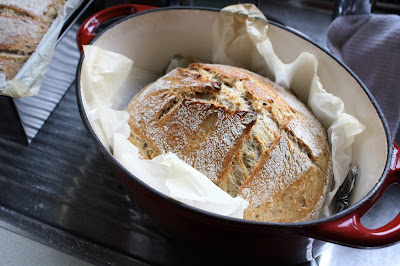
~ Below: My first 2 loaves of sourdough bread, with a new starter (about 15 days old) ~
~ My sourdough bread made with a starter that was about 3 weeks old (below) ~
also I used less wholemeal flour in this one. It had a beautiful
texture. ~
If you've ever wanted to learn to make Sourdough bread, I would suggest watching those videos. I found them enormously helpful. Below is the recipe from Elle's videos that I typed up. It's quite lengthy. Blessings to anyone who stops by :)
Here's another excellent link with some great sourdough recipes and more about the health benefits of eating this wonderful stuff !!
https://keeperofthehome.org/for-the-love-of-sourdough-starting-a-sourdough-adventure/

‘ELLIES’ EVERYDAY SOURDOUGH BREAD
Note on using the starter (recipe for the starter at the bottom of the post.)
I mix up the dough the night before. First I get the starter out of fridge (late afternoon). Measure out 1 cup of starter (or 2 cups of starter if your doubling the recipe for 2 loaves like I do. Remember you will need to double all the bread ingredients too)). Put the starter in a bowl (not metal). Cover with tea towel and let it froth up a bit. Now I re-feed the remaining starter in the jar (1 cup water – not too cold and 1 cup mixed flours. Mix well, incorporating the yeasty starter into it all. Scrape and clean down the sides of the jar with a fresh clean cloth). Put it back in the fridge. In the evening before bed. Add the mixed starter (in the bowl)to the ingredients in the above ‘Ellies’ recipe. Next morning proceed as her recipe indicates.
You don't have to warm up your starter or re-feed it before using if it's been in the fridge. As long as it went in super fresh and hasn't been there more than a week it will work beautifully! It being cold makes no difference either, in fact I think it's advantageous to have some cool ingredients in your dough (especially in summer) - cooler fermentation is always better than too warm!!
DOUBLE
ALL
INGREDIENTS FOR 2 LOAVES OF BREAD !!!!! (the recipe below yields 1 x loaf of
bread)
Ingredients:
• 2 cups plain/all
purpose/bread flour (Any white flour will do, not self/rise
• 1 cup whole wheat
flour (or you can just use 3 cups plain flour,
I like to keep whole grain flours to about a third - half at the
most).
I often use I use Australian stoneground atta flour, found in my
local Indian grocery. It's very finely ground from high protein hard wheat.
• ½ to 1 cup starter (mine is a
plain wheat starter)
• About 1 and 1/4 cups of
water
(This is quite a wet dough. Start with one cup of water and add
a bit more until it seems right. It has to be like a damp dough,if it's more
like a thick batter it's probably too wet. It has to have a bit of body!
Remember that it will slacken and seem wetter after long fermentation).
• 1 ½ teaspoons sea salt
• I also often add a few tablespoons of seeds: of eg. LSA
(linseed/flax, sunflower and almond meal), sesame seeds, pepitas, walnuts or
ground flax etc
for more nutrition and interest.
Method:
1. Mix salt, flour and any other dry ingredients well. Add water
and starter (you can premix these too if you like) and mix again until
everything is well incorporated. Test for hydration, you want a nice soft dough
but not sloppy! Cover the bowl with a plate and leave to rest for 30-60
minutes.
2. After the first rest, knead/mix/turn the dough briefly. I
just turn it onto itself a few times with a spatula in the bowl, a bit like a
stretch and fold action in the bowl. Cover again with the plate and leave on the
bench all day (go to work/sleep/whatever). If you are home for the bulk
fermentation, you can give it a turn a few times as well. This does help with
gluten development but is not absolutely necessary.
3. Come back to the dough after 8-18 hours (this really does
depend on your climate, in a Brisbane summer I only leave my dough for about 10
hours and place the bowl inside a large roaster or drinks cooler with a couple
of cool bricks and a lid - just to take the edge off the heat of the day).
Tip the dough out onto a damp bench (I use a water sprayer) and
stretch and fold the dough a few times with the help of a scraper (plastic
plasterer's knives from the hardware are great for this. You can also use a
flexible plastic spatula to turn the dough in the bowl (as I demonstrate in my
video). Leave the dough to rest, covered, for 15 minutes before final shaping.
4. Fold, roll or form the dough into whatever shape you like.
Place the dough seam side up in a banneton or oiled and floured bowl for final
proof. You can also place the dough seam side down on a piece of non-stick
baking paper and lift it into the proving bowl/vessel (as in my video)
5. Preaheat your oven with casserole pot/dutch oven/pizza stone
for at least half an hour to 250°C (very hot!).
6. Once the dough has risen to between two thirds and double its
original size, turn it out onto a peel or some non-stick paper (or just lift it
if you proved it on paper), carefully slash the top of the loaf if needed
(don’t slash if it is very well proofed), place inside your baking vessel and
cover. If you are using a pizza stone, place the dough on the stone and over
with an upturned steel bowl or other well-rounded lid or cover (to keep the
steam in). You can also spray the dough lightly with water before covering for
extra steam - totally optional - just make sure the dough is not wet on the
surface at any other stage, otherwise you might get a grey cast to your crust.
7. Bake the loaf covered for 25 mins, after which you can take
the cover off and bake for another 5-15mins until the crust is golden brown.
8. And presto! You've just made a delicious loaf of sourdough
bread.
~ ~ ~ ~ ~ ~ ~ ~ ~ ~
ELLIES SOURDOUGH STARTER
All you need for this recipe is:
- organic whole wheat
flour (you can also use organic whole rye flour)
- half a cup of unsweetened
pineapple juice (from the supermarket shelf or drained from a can is fine -
as long as it doesn't have extra sugar added)
- bread or plain flour to feed your starter once it is
established (or you can continue with wheat or rye)
- clean filtered water (not
chlorinated water as it may kill of the goodies in the starter.)
- and time!
Once your starter is established, it is easy to use it to make
sourdough bread. Just add ½ to 1 cup of sourdough starter to your bread recipe
instead of commercial yeast, then re-feed your starter, wait for it to become
active and bubbly again and store in the fridge again until next time.
DAY 1: Morning: Mix ½ cup unsweetened Pineapple Juice with ½ Cup of organic whole wheat flour
in a small china bowl or glass jar (not metal). Stir well to incorporate lots
of air, with a wooden spoon or spatula. Don’t use metal). Cover with a saucer
or clean t-towel.
Day 1: Evening: Stir well to incorporate lots of air (that’s all)& cover.
DAY 2: Morning & Evening: Stir well to incorporate lots of air (that’s all)and cover. By evening
there should be more signs of activity and quite a few more bubbles.
DAY 3: Morning: It should be alive, with lots more bubbles and runnier. It is now time to
start the discarding and feeding cycle.
Method:
Get a clean
glass. To the glass add 3 Tablespoons of organic whole wheat flour & 2
Tablespoons Filtered water & only 3 Tablespoons of the starter. Mix well to
incorporate lots of air, scraping down the sides. Cover with a paper towel
& rubber band or a small dish.
DAY 3: Evening: (12 hrs later) It should start to look more alive. In a clean jar/glass, tip out about ½,
until there’s only about 2 – 3 T of the remaining starter left. To the
remaining starter, add again add 3 Tablespoons of organic whole wheat flour
& 2 Tablespoons Filtered water. Mix well to incorporate lots of air,
scraping down the sides & cover.
DAY 4: Morning: It should have risen a bit and have bubbles. You should be able to see air
in there when it is stirred. Tip out about ½, until there’s only about 2 – 3 T
of the remaining starter left.
*To the remaining starter,
add again add 3 Tablespoons of flour.
Now it can be unbleached white or any bread flour, even rye and & 2
Tablespoons Filtered water. Mix well to incorporate lots of air, scraping down
the sides & cover.
The whole
wheat is very important in the beginning, as the flour is made from the whole
grain it has lots of yeast things on the grain.
- Wipe the
rim with a clean cloth.
DAY 4: Evening: (12 hours later) It should be fairly frothy at this point and really starting to get going.
Tip out about ½, until there’s only about 2 – 3 T of the remaining starter
left. To the remaining starter, add again add 3 Tablespoons of organic whole
wheat flour & 2 Tablespoons Filtered water. Mix well to incorporate lots of
air, scraping down the sides & cover.
DAY 5: Morning/Evening: (12 hrs in
between each time)It is now smelling yeasty (she actually
left hers to that evening to feed as they didn’t feed the Day 4 evening one
till very late. Otherwise it would have been just the same as Day 4, with the
feeding and discarding – morning and night. It should be really bubbly, pretty
runny, lots of little bubbles.
DAY 6: Morning/Evening: 12 hrs in between) It now clearly has lots of bubbly action. Repeat the same feeding cycle
morning and night – discarding ½ and feeding.
DAY 7 - 9: Morning/Evening: 12 hrs in between) It now clearly has lots of bubbly action. Repeat the same feeding cycle
morning and night – discarding ½ and feeding.
*Note: by DAY 7 hers was doubling in size, between
feedings.
DAY 10: Morning/Evening: 12 hrs in between) It now clearly has lots of bubbly action. Repeat the same feeding cycle
morning and night – discarding ½ and feeding. She started adding 1 rounded
teaspoon of organic rye flour to the mix too. It should be very frothy and
super active.
* At this
point the starter has a strong enough culture to make a loaf of bread. You can
also start to store it in the fridge so you don’t have to feed it twice a day.
Your starter is still young though, so while you can start to use it, it will
need several more weeks of regular use and feeding (feeding and discarding if
you are not ready to make bread) before it fully matures.
At this
point it will make a good loaf of bread. It won’t have the best texture, as a
more mature starter, but will still make a good loaf of bread. Follow her
instructions and watch the video for how to make the sourdough bread.


