
Hi everyone :)
I just checked and it's been exactly one month since I last posted. The last few weeks have been busy and I must say I am tired of hot/humid weather. We're hoping to install air conditioning later this month (please note: this is truly a hallelujah moment !!!! :). With cooler/cleaner air, I hope my energy levels will improve and my life here at home will be a lot more comfortable. Today was a hot/humid day and even though I didn't feel like doing much I pretty much worked all day and achieved quite a lot . Thankfully later in the afternoon we got some rain and things cooled off a bit.
At the start of the week I made out a list of things I need to do...some have been waiting for quite some time. I was hoping to make some skirts to wear over leggings and haven't done that yet. However I did finally get around to making the beeswax wraps today.
I watched an awesome video/tutorial on youtube by a lady called 'Crafty Patty'. I'll attach the link in case anyone else wants to watch it. She went through about 3 different ways of making them. Her tutorial goes for 45 minutes and she is very thorough.
Why did I want to make my own Beeswax Wraps? Because I am a nut and like to do things from scratch !! :)
but really...
1. I wanted to find an alternative to using plastic clingwrap/gladwrap, thereby reducing waste.
2. Beeswax wraps are quite expensive to buy and only come in packs of three sizes. sml/med/large
3. I wanted to be able to make different shapes and sizes.
4. I already had Beeswax and Jojoba Oil, so only needed to purchase the resin (which helps with the tackiness of the finished product, so it will stick to itself).
I initially bought Pine Rosin, but was put off by the strong odor/turpentine smell of it, even though many people use this to make their wraps, I was not happy to use it. I was concerned it would taint our food and thought the whole project was going to be shelved...until..
I did a little more research and found that some people used another resin called Damar Resin, which was meant to have a faint lemon aroma.
So I ordered some of that online. Note: I didn't find these resins to be cheap. Damar resin has a much softer smell..not really like Lemon though.
Here are some pictures of the melted wax/oil/resin mixture and the wraps painted with the mixture, then hanging up to dry.


H O W I M A D E M Y W R A P S :
Step 1. Cut your fabric to whatever size you want. I wanted some to wrap our snacks/crackers/muffins and for covering small bowls and dishes with. I also made a couple of extra large ones to cover a large casserole dish and to be able to wrap a loaf of homemade sourdough bread.
Step 2: Turn the oven on to 100C.
Step 3. Cover an oven tray completely with aluminium foil, tucking the edges under the tray.
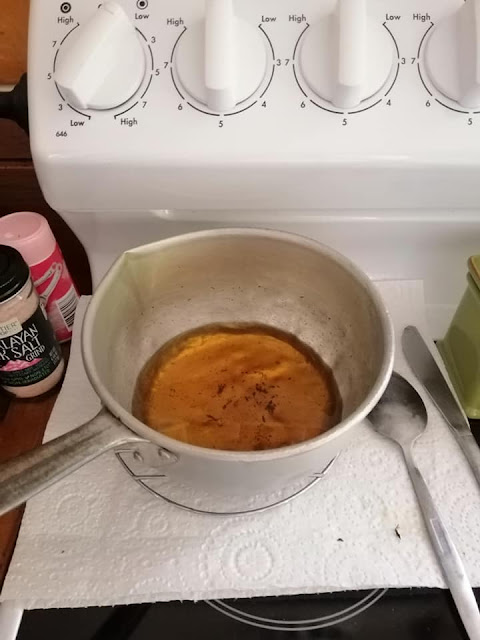
Step 4. On a low to medium heat, melt the 3 ingredients together. In total for this many wraps I used: 3/4 cup beeswax, 1 Tablespoon + 2 teaspoons Jojoba Oil and just over 1/4 cup of Damar resin. The damar resin is very sticky as its melting. I used a small old saucepan, plus an old spoon for craft purposes. Keep on stirring until fully melted and fluid.
Step 5. Place a piece of fabric on the foil lined tray and paint some of the mixture on, so it's soaks through the material.
Step 6. Place the tray in the oven. I put mine on fan bake. Leave it in for around 5 minutes. This helps the wax to melt into the material more evenly. Remove from the oven and check to see if all areas of the fabric are evenly coated.
Step 7. Remove it from the tray and wave it around a bit so it starts to dry. I laid mine over a pasta drying stand and then removed them to my clothes horse stand to further dry.
Conclusion: I still think it's more economical to make Beeswax Wraps yourself, well it was for me because I use beeswax and Jojoba oil in my soap business and didn't need to but them. If you had to buy all these 3 products (in small quantities) which is always more costly, plus shipping, then I don't know if it would be such a good idea.
Note: I find the finished product to be very tacky/bees-waxy. It certainly sticks to itself. It has a lovely aroma :) that I am pleased with. They also make my hands feel lovely and soft..and a little tacky lol.
Update: I have been using the wraps this week and they work great ! A couple of days curing seem to help them. After wrapping a cracker I just rinsed the wrap under cold water and lightly scrubbed it with a soft brush to get any crumbs off. Then I left it to dry before storing.

Craft Patty's Excellent tutorial:
I just checked and it's been exactly one month since I last posted. The last few weeks have been busy and I must say I am tired of hot/humid weather. We're hoping to install air conditioning later this month (please note: this is truly a hallelujah moment !!!! :). With cooler/cleaner air, I hope my energy levels will improve and my life here at home will be a lot more comfortable. Today was a hot/humid day and even though I didn't feel like doing much I pretty much worked all day and achieved quite a lot . Thankfully later in the afternoon we got some rain and things cooled off a bit.
At the start of the week I made out a list of things I need to do...some have been waiting for quite some time. I was hoping to make some skirts to wear over leggings and haven't done that yet. However I did finally get around to making the beeswax wraps today.
I watched an awesome video/tutorial on youtube by a lady called 'Crafty Patty'. I'll attach the link in case anyone else wants to watch it. She went through about 3 different ways of making them. Her tutorial goes for 45 minutes and she is very thorough.
Why did I want to make my own Beeswax Wraps? Because I am a nut and like to do things from scratch !! :)
but really...
1. I wanted to find an alternative to using plastic clingwrap/gladwrap, thereby reducing waste.
2. Beeswax wraps are quite expensive to buy and only come in packs of three sizes. sml/med/large
3. I wanted to be able to make different shapes and sizes.
4. I already had Beeswax and Jojoba Oil, so only needed to purchase the resin (which helps with the tackiness of the finished product, so it will stick to itself).
I initially bought Pine Rosin, but was put off by the strong odor/turpentine smell of it, even though many people use this to make their wraps, I was not happy to use it. I was concerned it would taint our food and thought the whole project was going to be shelved...until..
I did a little more research and found that some people used another resin called Damar Resin, which was meant to have a faint lemon aroma.
So I ordered some of that online. Note: I didn't find these resins to be cheap. Damar resin has a much softer smell..not really like Lemon though.
Here are some pictures of the melted wax/oil/resin mixture and the wraps painted with the mixture, then hanging up to dry.

~ The mixture all melted together ~

a small round wrap - suitable for covering a small round dish. I placed a bread and butter plate on the fabric and drew around that and cut the fabric out using pinking shears.

~ Air drying on the pasta racks and then onto the clothes horse ~

~ Wrap demo with an apple of how well it sticks to itself ~


~ Folded neatly into different shapes - round and square ~
and into a storage container. I lined the container with parchment paper, as the wax is tacky
and covered it with a lid ~

Step 1. Cut your fabric to whatever size you want. I wanted some to wrap our snacks/crackers/muffins and for covering small bowls and dishes with. I also made a couple of extra large ones to cover a large casserole dish and to be able to wrap a loaf of homemade sourdough bread.
Step 2: Turn the oven on to 100C.
Step 3. Cover an oven tray completely with aluminium foil, tucking the edges under the tray.
Step 4. On a low to medium heat, melt the 3 ingredients together. In total for this many wraps I used: 3/4 cup beeswax, 1 Tablespoon + 2 teaspoons Jojoba Oil and just over 1/4 cup of Damar resin. The damar resin is very sticky as its melting. I used a small old saucepan, plus an old spoon for craft purposes. Keep on stirring until fully melted and fluid.
Step 5. Place a piece of fabric on the foil lined tray and paint some of the mixture on, so it's soaks through the material.
Step 6. Place the tray in the oven. I put mine on fan bake. Leave it in for around 5 minutes. This helps the wax to melt into the material more evenly. Remove from the oven and check to see if all areas of the fabric are evenly coated.
Step 7. Remove it from the tray and wave it around a bit so it starts to dry. I laid mine over a pasta drying stand and then removed them to my clothes horse stand to further dry.
Conclusion: I still think it's more economical to make Beeswax Wraps yourself, well it was for me because I use beeswax and Jojoba oil in my soap business and didn't need to but them. If you had to buy all these 3 products (in small quantities) which is always more costly, plus shipping, then I don't know if it would be such a good idea.
Note: I find the finished product to be very tacky/bees-waxy. It certainly sticks to itself. It has a lovely aroma :) that I am pleased with. They also make my hands feel lovely and soft..and a little tacky lol.
Update: I have been using the wraps this week and they work great ! A couple of days curing seem to help them. After wrapping a cracker I just rinsed the wrap under cold water and lightly scrubbed it with a soft brush to get any crumbs off. Then I left it to dry before storing.
~ A covered bowl of leftovers in the fridge ~
It's one thing to think about making a change in your lifestyle.
It's another step to actually do it, and then when
it's done and you step onto that new path
it's a good feeling :) Procrastination is defeating..action brings peace.

Craft Patty's Excellent tutorial:
~ Please leave a comment if you read this blog and/or have a go at
making these too. I'd love to hear from you. :)
Blessings to you all ~
L I N D A xo


I love beeswax wraps, although I have made mine without the resin (it's so expensive!). Where did you buys yours?
ReplyDeleteI was honored to see my blog on your list on the sidebar. Thank you, my dear!
Hi Gigi :) I purchased mine in New Zealand, just online. However I just googled Damar Resin and this came up for Amazon: DAMMAR GUM Resin. If you type in that (spelt with 2 'R's' then it will take you to the link. It looks to be cheaper with the shipping than what I paid here. A little will go a long way, as they are selling 500g bags !!! I paid about $30 for 250g :( (1/4 pound). Oh well, we live and learn. I think I have used a little too much wax on mine as they are quite tacky. I'm going to reheat some in the oven on a foil lined tray an press some more fabric shapes into the excess :). Blessings to you Gigi
ReplyDelete